WordPress St. Louis Developers Meetup Notes

Tonight marks the first night of a meetup in St. Louis for WordPress developers! I know, exciting times right? Tonight’s meeting was more of a planning meeting for the future of the group.

When and where will we meet in the future?

It was suggested that we meet at 6:30 instead of 6 pm. We are going to post another poll for the group to figure out the optimal week for the meetup. Apparently the STL Ruby group meets on the 2nd & 4th Monday of the month. And the regular WordPress meetup group meets the 3rd Wednesday of the month. I think the consensus is to stay with Mondays, just figure out the best week for it. The location will stay as Integrity Corporation for the time being.

Suggested Topics for Group Discussion/Presentation

  • Theme review
  • Code review
  • Enterprise deployment and setup
  • How to create a plugin from scratch
  • Security best practices
  • Speed optimization for WordPress
  • Discuss your development environment (how do you make your WordPress magic happen)
    • What tools do we use? (IDE and other useful tools)
    • Testing environment (PHPUnit, etc)
  • Actions and filters
  • Rewrite Endpoints
  • Using WordPress as a service (REST, XML-RPC)
  • Advanced Custom Fields
  • Database/table management best practices
  • Exploring the WordPress database (talk about the tables and how they tie together)

Other Stuff

We also talked about working on plugins/themes together as a group. And we talked about creating an organization on GitHub to host the code. I’m really excited to see what we come up with as a group! Please leave comments below for anything that I left off, or other topics to discuss.

Object-Oriented Plugins for WordPress

Making your WordPress plugins (and themes for that matter) object-oriented definitely has it’s benefits; most notably not running into naming conflicts with other functions. You are essentially creating a new workspace for your functions to live and could have the same function name as found in the WordPress core.

How to Get Started?

Plugin Declaration

The first part of the code is your plugin declaration in the commented out lines. This is required by WordPress!

Class Declaration

You will have to create a unique class name for your plugin. Once you’ve figured out what to call it, you’ll want to add a __construct() function to it. This is typically where I will put all of my actions and filters, along with any special initialization code for my plugin.

Actions and Filters

This line may look a little different from normal add_action() and add_filter() calls. For our second parameter, instead of passing a string for our function name, we are passing an array containing our class object, $this, and the corresponding function in our class, admin_init. The function name is arbitrary; it could be erics_super_awesome_admin_function for all WordPress cares. I typically name my function the same thing as the action or filter for clarity on my end. It seems easier to find things that way to me, and I know precisely when it’s going to happen.

Instance of Class

This is a major step. If you forget this, your plugin (or theme) won’t work. We have to create an instance of our class for the code to run. I’ve created a new variable named $my_object_oriented_plugin that contains an instance of the class.

Questions?

Fire away in the comments.

I would highly recommend that anyone doing WordPress plugin or theme development look into writing object-oriented code. It’s not as hard or scary as people think it is.

Keyboard Shortcuts on the Mac

A coworker and I recently decided to try switching to the Mac from Windows  7. We have been using Mac hardware and have just used Bootcamp to run Windows 7. I feel I’ve been adjusting fine so far except for the keyboard shortcuts!

As a developer, I spend a lot of time working with text editors/development studios. I’m unsure why Apple feels it has to be different when it comes to keyboard shortcuts. The Command key, I understand, but I’m having the hardest time going from the beginning of a line to the end of the line. On Windows (and Linux) to go to the end of the current line, you simply hit the End key. Pressing the End key on a mac will bring you to the end of the document. Same for the Home key; it brings you to the beginning of the document on Mac, instead of to the beginning of the current line on Windows (and Linux).

If something is going to convince me to switch back to my nice, comfy pc, it’ll be the keyboard shortcuts!

Edit: Oh, lifehacker, you never fail me! Let that be a lessons girls and boys…always google before griping!

Edit Post Author Name in WordPress Feeds

Just today someone approached me at work about the author’s name displaying in Google search results instead of our company name. You can change what shows for each individual author in the your profile for WordPress, but if you want to keep it all the same regardless of who posted the article (useful for a business), you can use the following code as an example:

What’s Going On in this Code?

The first thing we are doing is using an action in the feed file to set a global variable that says we are currently in the feed.

Note: WordPress offers different types of feeds, so you may want to perform this for each of them. If you look in your wp-includes/ folder, you should see some files that begin with “feeds-“. Each of these has their own hook you can use to create the global variable (as done above in the my_rss2_ns function). I’ve listed the file and the hooks below:

File Hook
wp-includes/feeds-rdp.php rdf_ns
wp-includes/feeds-rss.php rss_ns
wp-includes/feeds-rss2.php rss2_ns

The last thing we are doing is simply checking if our global variable is true, and if so, updating the author text with something we’ve specified.

Custom Taxonomy Control for the Theme Customizer

Otto had a series of articles highlighting how to use the theme customizer in your WordPress themes instead of creating an options panel.

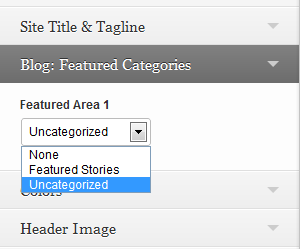
One of his articles covered making your own custom control and it inspired me to make a custom control for showing a certain taxonomy dropdown on the theme customizer. At first, I had just wanted this for the purpose of choosing from a dropdown of categories to use as featured posts in my theme. Then I thought it could really just as well be used for any taxonomy object. Behind the scenes, this control is using the wp_dropdown_categories function, which allows you to build a dropdown of categories (or any other registered taxonomy).

The code for the control really wasn’t bad. After actually implementing this and trying to use it, I found that my changes were not being saved. There is a data-customize-setting-link attribute that must be appended to your element. Below is the code from my functions.php file and the class being called by functions.php:

Extending Hide Inactive Sites Plugin

In my Hide Inactive Sites plugin I’ve added several filters to manipulate the data. You can modify the emails sent to the end users and edit the times available in the plugin settings. I thought it might be helpful to show how to change some of these that may want to do so.

Note: please never edit the plugin code directly! You are best off creating your own plugin or putting code in your theme’s functions.php file.

Let’s say that I want to warn my users that their site will be hidden if they haven’t updated it in 2 days. Well, by default, the plugin doesn’t offer you the option to warn in 2 days. It allows you to warn after 1 day of inactivity. One week is the next closest time to warn a user of inactivity. So, let’s add an option for “2 days”:

function add_inactivity_warning_threshold($inactivity_warning_thresholds){
    $inactivity_warning_thresholds[60*60*24*2] = __('2 Days');
    return $inactivity_warning_thresholds;
}
add_filter('hide-inactive-sites-manage-inactivity-warning-thresholds', 'add_inactivity_warning_threshold', 1, 1);

Ok, how about another example? Let’s edit the text sent in the email when a site is hidden:

function edit_hidden_email_message($message, $site_details){
    $message = '';
    $message .= '

Hey admin, your site is no longer available! You should probably have updated it more often!

'; $message .= ''; } add_filter('hide_inactive_sites_edit_site_hidden_message', 'edit_hidden_email_message', 1, 2);

Other Filters Available

Site Hidden Email

  • Edit list of email recipients: hide_inactive_sites_edit_site_hidden_to_emails
  • Edit email headers: hide_inactive_sites_edit_site_hidden_headers
  • Edit subject line: hide_inactive_sites_edit_site_hidden_subject
  • Edit message (used above): hide_inactive_sites_edit_site_hidden_message

Site Warning Email

  • Edit list of email recipients: hide_inactive_sites_edit_site_almost_hidden_to_emails
  • Edit email headers: hide_inactive_sites_edit_site_almost_hidden_headers
  • Edit subject line: hide_inactive_sites_edit_site_almost_hidden_subject
  • Edit message: hide_inactive_sites_edit_site_almost_hidden_message

Plugin Options

  • Edit update frequencies: hide-inactive-sites-manage-update-frequency
  • Edit inactivity thresholds: hide-inactive-sites-manage-inactivity-thresholds
  • Edit inactivity warning thresholds: hide-inactive-sites-manage-inactivity-warning-thresholds
  • Edit number of minimum posts: hide-inactive-sites-manage-min-posts

Allowing Editors to Clear the Cache using Quick Cache

I started using Quick Cache on a site recently and some of the publishers (setup as editors) wanted to be able to clear the cache manually to ensure their posts went live right away. So I wrote a quick script to handle that. I’ll probably release a plugin for this eventually, but for now…here’s the code:

function check_publish(){
    global $current_user, $post;
        
    $capability = 'publish_';
    // Check current post type...if we have one available
    if($post->post_type != ''){
        // Set the capability we are looking for to publish_s
        $capability .= $post->post_type . 's';
    } else {
        // Set the default capability to publish_posts
        $capability .= 'posts';
    }
    
    // Check if the user has rights to publish a post
    return current_user_can($capability);
}
add_filter('ws_plugin__qcache_ms_user_can_see_admin_header_controls', 'check_publish');

This will include the Clear Cache button in the admin section of WordPress.

Update: I’ve released this plugin on wordpress.org.

WordPress Workflow Plugin in the Works

As part of our migration to WordPress at work we needed some sort of workflow to check the pages before they go live. Sort of a last check to make sure the styling looks good.

When I first started this “holy grail” search, I evaluated a few plugins:

Edit Flow

Edit Flow seemed really robust, but it was meant more for new content. I needed something that would work with editing existing content, like pages. Edit Flow would allow you to change the status, but that would actually remove the page from your site, because it is no longer considered published…not what I wanted to do.

Post Revision Workflow

Post Revision Workflow seemed closer to what I was looking for. I felt it gave too many options to the end user. I wanted to decide who would receive notification, not let the end user decide. But I liked how it worked on the backend. Basically, after updating a post/page/or other custom post type it creates a revision in the posts table. If you saved it as a draft, this plugin would look at the revisions and re-publish the previous revision (the actual one you wanted to be live and not your draft).

My Solution

My solution, Approval Workflow, was highly influenced by Curtiss Grymala’s Post Revision Worfklow plugin. Approval Workflow allows you to set a group as the approvers. Note: this group must have publish permissions. The approvers get notified by email when someone has submitted something to the workflow. This works on WordPress Multisite too, but I’m using a custom plugin to manage the roles between sites. More on that topic here.

End Users

As an end user (someone without publish permissions), they have an option to Submit to Workflow that must be checked when saving the page. This triggers an email to all of the approvers notifying them a new page is ready to be reviewed. If the box is not checked when they save, it will make a new revision in the database and keep the published page the same as it was. When the user loads the page after updating, it will automatically show all of the draft copy they were just working on. Technical note: this was probably the most difficult part to figure out. I ended up hooking into the add_meta_boxes hook to update the post content before the page finished loading.

Approvers

As for the approvers, they receive an email, but they also have a snazzy dashboard to view within WordPress. I couldn’t have put this dashboard page together without the help of WP Engineer for creating my own WP_List_Table. I’ll eventually expand this too, giving the ability to search, filter and maybe even some batch actions.

Comparing Revisions
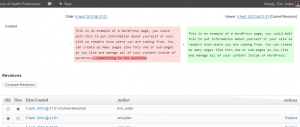
I ended up using the built-in comparison feature that WordPress offers for the actual approval part of the process. When the approver restores a revision, it marks the page as no longer in the workflow.

What’s Left

I need to add a notification at the top of the page saying it hasn’t been submitted to the workflow yet, if it has some pending changes out there. I can see the users getting lost and forgetting to submit it to the workflow. I have to hide the site column from the dashboard if it’s been run on regular WordPress. Also, it needs a little more testing too, before I release it to the masses.

WordPress Options Class

I came up with an object-oriented way of working with my plugin’s options for my work projects.

Creation

So then all I have to do in my class is create an instance of this:
$options = new My_Plugin_Options('my_plugin_options_name');

Accessing

It will store all of your plugin options in 1 record in the database as an array. You can easily access one of the options by doing this:
$this->options->my_first_option

Saving

After updating all the options, we need to save them at once.
$this->options->save();

My Setup

I’ve created a folder inside wp-content/plugins for some code that I use on multiple plugins/themes at work. I don’t have the plugin declaration at the top of the main file, so it doesn’t get recognized as something needing activation. All I do is require the main file in my plugins and themes and that file includes the rest of my classes; the Options class being one of them. I’ve also created a couple classes for dealing with custom post types and taxonomies.